Hi!
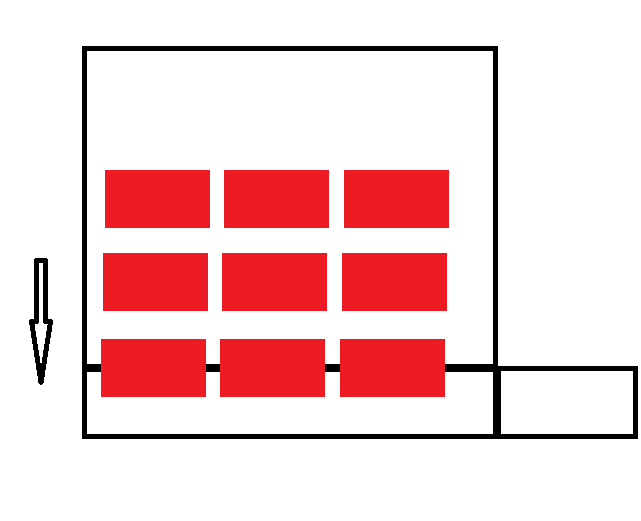
I´m picking 9 objects from a pallet with a robot and placing them on a Work Process, they are then transported out one by one. I need to transport them out three by three, how can I do that?
![]()

In the picture above you can see that each object is transferrd out one at the time, but I need it like this:
The pallet is created by another work process by using the function CreatePattern so all the object has the same ProdID.
Thankful for any help 
Let’s not reinvent the wheel. See the attached layout for help.
Often times, the easiest solution is to add more logic and control to solution. So I executed the same CreatePattern task three times. However, each time I only added one row of parts in the pattern. I then executed a ChangeID task to mark that row with a unique id. After making the pattern, I merged each row together by making the back row the parent.
After flowing the pattern downstream, I split the pattern up by passing each row’s unique id. I then merged parts in the same row to one another, and then transported out everything. That is, the front row moves out first, followed by middle row, and then the back row.
Does this help you?
Demo-Transport-Out-Row-by-Row.vcmx (926 KB)
Hi Zesty,
Big thanks for your answer!! the attached demo is great and just what I want but I cant still get it to work 
This is what I do:
Create a pallet with a 3 rows like you (front, Middle, Back), In the end all get merged to the euro pallet and then TransportOut.
<p style=“text-align: left;”> </p>
</p>
When the pallet reaches the second work process (pick up place) i run TransportIn and Split (Front,Middle,Back).

The Robot gets triggered and collects the first layer and put it on the third work process. Here I run TransportIn, Merge (Front), Merge (Middle), Merge (Back) and the TransportOut. But it still takes one by one…?!

From the different work processes
-
Create:Euro Pallet:
CreatePattern:Cube:3:3:5:400.0:270.0:300.0:1:3
ChangeID:Cube:Back
CreatePattern:Cube:3:3:5:400.0:270.0:300.0:4:6
ChangeID:Cube:Middle
CreatePattern:Cube:3:3:5:400.0:270.0:300.0:7:9
ChangeID:Cube:Front
CreatePattern:Cube:3:3:5:400.0:270.0:300.0:10:12
ChangeID:Cube:Back
CreatePattern:Cube:3:3:5:400.0:270.0:300.0:13:15
ChangeID:Cube:Middle
CreatePattern:Cube:3:3:5:400.0:270.0:300.0:16:18
ChangeID:Cube:Front
CreatePattern:Cube:3:3:5:400.0:270.0:300.0:19:21
ChangeID:Cube:Back
CreatePattern:Cube:3:3:5:400.0:270.0:300.0:22:24
ChangeID:Cube:Middle
CreatePattern:Cube:3:3:5:400.0:270.0:300.0:25:27
ChangeID:Cube:Front
CreatePattern:Cube:3:3:5:400.0:270.0:300.0:28:30
ChangeID:Cube:Back
CreatePattern:Cube:3:3:5:400.0:270.0:300.0:31:33
ChangeID:Cube:Middle
CreatePattern:Cube:3:3:5:400.0:270.0:300.0:34:36
ChangeID:Cube:Front
CreatePattern:Cube:3:3:5:400.0:270.0:300.0:37:39
ChangeID:Cube:Back
CreatePattern:Cube:3:3:5:400.0:270.0:300.0:40:42
ChangeID:Cube:Middle
CreatePattern:Cube:3:3:5:400.0:270.0:300.0:43:45
ChangeID:Cube:Front
Merge:Euro Pallet:Front,Middle,Back:False
TransportOut:Euro Pallet:False
-
TransportIn::True
Split:Front,Middle,Back
-
TransportIn::False
Merge:Back:Back:False
Merge:Middle:Middle:False
Merge:Front:Front:False
TransportOut::True
Thankful for help with this
See the attached layout. The logic of the tasks in that layout can be simplified, but I left them that way to make it easier to understand what is happening. I also introduce the use of StoreProdID and RestoreProdID.
If your products are going out one-by-one, they are not merged. What I would do is refer to your last screenshot. Stop the simulation and select the outgoing box and verify its ProdID. Do the same for the other two boxes that were inline with it before leaving the station. Might also be a path axis issue, but not sure without having the layout.
But I think you are on the right track. It is just a matter of figuring out what needs to be attached together and how to do that.
Demo-Transport-Out-Row-by-Row-from-Stack.vcmx (1.52 MB)
Hi Zezty,
I couldn’t get you demo to work, the robot locks it´s joints.
I have attached my layout (down scaled).
Best Regards
Edmund
Test_Outfeed.vcmx (813 KB)
Just move the robot controller further away from those two stations. Example of XYZ {2674, -1498, 0}
You can also change the Configuration property of the robot controller to FRONT ABOVE NOFLIP
The reason the joints lock is probably because you have the “Stop at limits” option selected in the Program tab.
Your layout did not package/include components, so I cannot see anything except the conveyor and gripper.
However, this is where I leave you, my friend. Others can help you further.
Demo-Transport-Out-Row-by-Row-from-Stack-1.vcmx (1.48 MB)
Thanks Zesty.
I have included components in the new vcmx file.
Does it matter that I dont runt the native robot controller and uses Feed/Need? I have a Kuka Robot with a manually programmed program?
Test_Outfeed-1.vcmx (3.87 MB)
Yes, it matters. You are also using Kuka.Sim based on the robot program in your layout, which does not come with the Works library… last I heard that was the situation on the ground.
What I suggest is to use a WarmUp time of 18 seconds to troubleshoot the issue.
A TransportIn task is not working the way you think it is. It is for components entering through the Input port. Your robot program also needs some touchups because the boxes are intersecting with the conveyor geometry. Using a SensorConveyor task does not look like it will solve everything.
What I would suggest is to use Feed and Need. In the robot program, there will be prepick and preplace subroutines. In those routines enter the instructions you want to use for picking the layer of boxes and placing them without calling signal actions for grasping and releasing. From there, fine tune the advanced properties for picking, placing etc in Works Process.
If that is not an option, I would use Sim.Pro to create a new, custom task in Works. The task would wait for an output from robot, and then grab all of the components to its container. From there on, you could use the Merge tasks, etc.
Instead of creating a brand new task though, just go to the OnRun script in the Works Process where the boxes are placed and modify the WaitSignal task to do what I described earlier. Why?
Otherwise, others can give better suggestions. Or tell us both what is really happening.